Wednesday, November 14, 2012

The Little Blue House 12 Days of Ornaments #4

Welcome ! This is Lynette bringing you Day # 4 of the LBH 12 Days of Ornaments. Introducing my Rusty Pinecone Ornament!
Looking at Facebook one day, I saw a post, from a friend from High School,Cindy Ripley, that lives in Venice Beach, California. She operates a ceramic studio, Luna Garcia. Her work is amazing. She posted a picture of a pinecone sculpture, made from rusty shovels.The artist of this sculpture is Patrick Plourde.
I just love the sculpture. Not only could I not afford it, I would have no place for it. I started thinking about how this could be made on a small scale. Plastic spoons look like shovels, right? I decided they would need to be attached to a base, so a styrfoam egg came to mind. The first attempt looked more like an artichoke than a pinecone, so heating and shaping the spoons would be my next try. It worked.

Supplies needed:
4" styrofoam egg
approx. 40 lightweight plastic spoons
hot glue & heat gun
brown acrylic paint
*Verday paint ( iron, bronze, and copper ) available at LBH
Verday spray activator
foam brush & small bristle brush
9" pice of jute
1/2 yard ribbon
2 small jingle bells
2 die cut pine sprigs (Tim Holtz)
awl or pick

To get started, set aside 4 plastic spoons.Using a heat gun heat the remaining plastic spoons. You can see the plastic start to soften. Press the spoon against the edge of the table, bending back the tip.
After you have melted and shaped all of the spoons, cut away the handle using heavy duty scissors.
Attach four unbent spoons using a hot glue gun to the styrfoam egg. Put glue on the inside bottom and up the sides and attach opposite each other.

Points should meet in the center.Next, start another row alternating and placing 4 more bent spoons on the egg.
You should be starting this row on the center of egg. alternate and attach four more bent spoons. On the same level, but alternating, add 4 more.
Divide the space that is left and start another row. This time glue 9 in a row. Repeat this step, one more time.
Next, close to center add 6 spoons in a row.
If any of the spoons are sticking out too much, heat and conform them to egg shape. Silicone finger tips would work for this step.
As you heat and conform , you might need to add a few spoons to the top. To finish, heat one spoon and while it is hot, stick an awl in the center to make a hole for the hanger. Tie a knot in the center of the jute and pull the two ends through the hole. Hot glue to top.
Paint the entire egg with brown acrylic pain, using a foam brush. . Let dry , then holding the pinecone looking from tip down, paint in crevices with a small bristle brush.
Paint the entire " pinecone " with Iron Verday paint. Spray with activator. After this has dried dab on areas with the bronze and copper Verday paint. Re-spray with the activator. Let set. The Verday paint will start to patina right before your eyes. It's magic!
If you have not taken a Verday class at The Little Blue House, you should consider it...You will love the techniques we can share with you!
It will take a bit of time for the patina's to become more evident...be patient...it's worth the wait!

Tie a figure eight bow.Tie a knot in the center of a length of ribbon. Place knot in the center of the figure eight bow and tie. Tie this bow onto the jute hanger.String two jingle bells onto baker's twine and tie around bow.
Hope you will try making one of these ornanments. You could leave the hanger off and place a number of these in a bowl, on a wreath, or arrangement.
Be sure to post a comment and you may be the lucky winner of this Rusty Pine Cone Ornament...and stay tuned for the next ornament tutorial.

Merry Christmas,
Lynette Chiles

The WINNER for Day #3's Glitzy Washi Tape Ornament is...
CASEY ADAMS

Congratulations Casey! Please stop by or call the LBH to claim your ornament.

Wednesday, September 12, 2012

Trick or Treat --- Smell My Feet

Hope to see all of you at The Little "Boo" (Blue) House Friday or Saturday. Here is a sneak of one of the projects:
Check out the blog for more info: www.thelittlebluehouseblog.blogspot.com.

Friday, August 17, 2012

Front Porch Friday

Hello Everyone ! It is Front Porch Friday for the Design Team for The Front Porch Kits.

I would like to share one of the projects I designed for the latest Front Porch Kits, Just Add .... Water.
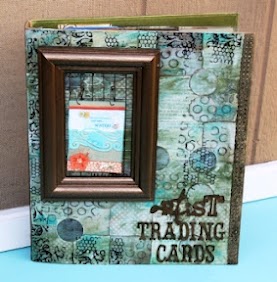
I made a notebook to hold all of the Artist Trading Cards I have made and traded with friends.I started with a chipboard notebook that I painted the inside and back of the binder with acrylic paint. I cut random sizes of patterned paper and cardstock from the kit.I also punched circles from the paper and added them in a random pattern. I decoupaged them on the cover. After the cover had dried thoroughly, I applied Distress Stain. I used Broken China , Frayed Burlap, and Peeled Paint. Immediately after you add a color you apply mod podge to move the ink and seal. I also stamped with black archival ink random background stamps. You also can rub a hint of acrylic paint on it as well. You just work with layers until you have achieved the desired look you want.
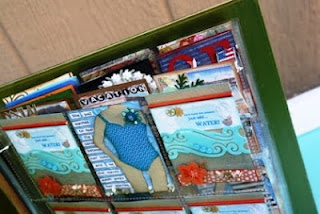
I happened to be standing in The Little Blue House the day that Scott, Tracy's hubby walked in with Clip Art Frames ( available at The Little Blue House). I knew I had to have one the smallest Clip Art Frames to do something with. I painted the frame metallic bronze and attached it to the top of the notebook using flattened bottle caps as risers. I used the small hooks that were in the kit to hang my latest Trading Card Creation. The title was cut on the Cricut using Phrases and Storybook.I applied it to the notebook with mod podge as well.
I just happened to have made an additional six Just Add ... Water Trading Cards. I would love to trade them with the first 6 people that create an Artist Trading Card using their Just Add.... Water Kit.Just bring them into The Little Blue House or mail and I will tell the LBH Gals to give you one in return. I can"t wait to see what I get in return.
If you have not ordered your kit you are in luck, because there are a few left.So.....
Go to The Little Blue House
118 West Olive Street
Keller. Texas 76248
(817)431-7930


Be sure to look online at the Gallery to see what all has been done with this kit. Also, follow the other designers blogs for more inspiration and instruction for Front Porch Friday.

Tuesday, July 31, 2012

Just Add .... Water - Reveal

I am excited to reveal the projects I completed using the new :


The first project is a double page layout titled "Under the Sea"


A notebook to hold my Artist Trading Cards


Note : Later in the week I'll reveal how you can get one of the Just Add....WATER trading cards.

A Treasure Box and Book:


A canvas titled : Friends Strolling in the Rain


And last but not least, a book made from the surface item in the kit, a beach bag named Calli.


I did one other layout ( photo not available at this time) and have enough to do another layout. You must drop by the store to see the local design team's projects. All are super fabulous. I can't wait to see the other design team members work. The kits are available at                                                                           The Litlle Blue House
                                                                          118 West Olive Street
                                                                          Keller, Texas 76248
                                                                          (817) 431 - 7930
Or online :  thelittlebluehouseonline.com
Be sure to view the gallery to see what all can be done with Just Add .... Water !


Monday, July 30, 2012

Sand between your toes.

Dreaming of sand between your toes, cool water, seashells,


It is time to order your Front Porch Kit , Just add ....WATER from
The Little Blue House
118 West Olive Street
Keller, Texas 76248
(817)431-7930
thelittlebluehouseonline.com
thelittlebluehouseblog.blogspot.com

Tomorrow, Tuesday July 31, the full reveal for Just Add ....Water will be online. You will be able to view the entire gallery. See you there. I am excited to see all the designer's creations.


Sunday, July 29, 2012

Splash

You can have a splashing good time with our newest


Here is another little snippet of one of the designs created with Just add.....WATER.
 
The Little Blue House
                                                                118 West Olive Street
                                                                Keller, Texas 76248
                                                                (817)431-7930
                                                                thelittlebluehouseonline.com
                                                                thelittlebluehouseblog.blogspot.com
Don't delay.......Order Now!!!!!


Saturday, July 28, 2012

Raindrops

During the summer in Texas, raindrops are a welcome site. Our newest :
...gives you the opportunity to be inspired by cool blues and corals and sand.

This newest kit is now available for pre- orders at:
The Little Blue House
118 West Olive Street
Keller, Texas 76248
(817)431-7930
Or place your order online at
thelittlebluehouseonline.com
Be sure to check all the designers' blogs by following
thelittlebluehouseblog.blogspot.com